Showing posts with label Blogging. Show all posts

Thursday, 21 April 2016

How to Remove Hyperlinks form Image in Blogger Post

How to disable the hyperlinks form images in blogger post

In Blogger when we upload a image by default it make a hyperlink to that image, whenever someone click to the image it causes to be opened in a new tab window this is the default behavior for the images in blogger. One of my users asked me, is any way to remove this hyperlink form image in blogger post? Today in this post we will learn how we can remove the hyperlinks that are created automatically.

Probably there are many ways to remove hyperlinks but the shortest and the easiest way we can do this is by the Two methods that are given below.


The easy way to do is with CSS code, as it’s not a behavioral language (ie. Java Script). To remove the hyperlink form the pictures of your blog post you can use the pure CSS.

STEP - 1  GO to Blogger > Templates > Edit HTML
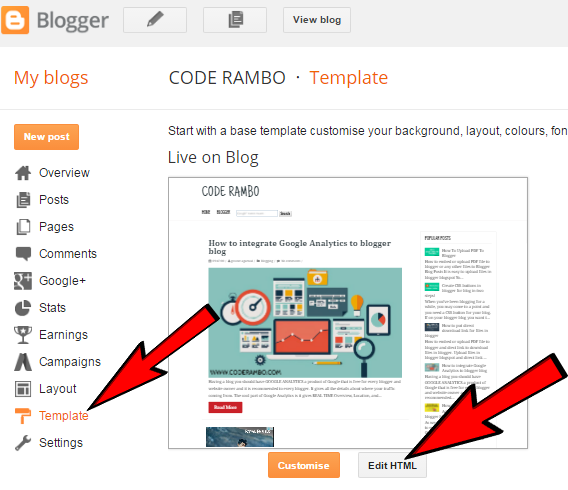
How to disable the hyperlinks form images in blogger post

STEP - 1  Search CRTl + F For

.post img

Note: If you don’t find the .post img then search for

</b:skin>

Then past the below code inside it and if you find the code .post img then just replace code with the below code.

.post img{max-width: 100%;
height: auto;
pointer-events: none;
cursor: default;
}

It will make the image link not clickable and the cursor style as a arrow, then the image will not open in new tab windows and this is probably the shortest code for doing this.

Now click on SAVE TEMPLATE You are all done.

One of the alternative methods to disable the hyperlink of the image in blogger post is to remove the link form your post before publishing.

STEP - 1  Upload your image then click HTML
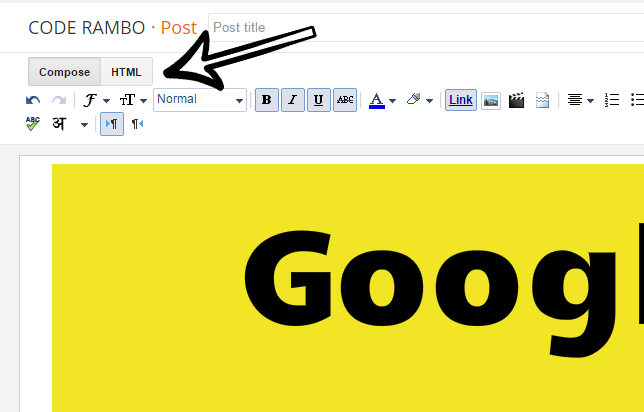
How to disable the hyperlinks form images in blogger post

There you will find code of image that you have uploaded, which something look like this.
<a href="https://blogger.googleusercontent.com/img/b/R29vZ2xl/AVvXsEg7zbR-wQYJkQF5yDVL7ZdQ97Uiue2ZJm9xsk6P3znr04GY1tRtMSreCptwnDdRQdzH-VxiBFpycqBDuykXWKscRaD2ruwlL9ZfMLRZGCNpWYQTgGNJFCsiBFz2EzGNz7URjKl-XAmd63jO/s1600/how-to-remove-hyperlink-form-image-go-to-HTML.PNG" imageanchor="1" >

<img border="0" src="https://blogger.googleusercontent.com/img/b/R29vZ2xl/AVvXsEg7zbR-wQYJkQF5yDVL7ZdQ97Uiue2ZJm9xsk6P3znr04GY1tRtMSreCptwnDdRQdzH-VxiBFpycqBDuykXWKscRaD2ruwlL9ZfMLRZGCNpWYQTgGNJFCsiBFz2EzGNz7URjKl-XAmd63jO/s1600/how-to-remove-hyperlink-form-image-go-to-HTML.PNG" />

</a>

Just remove the highlighted code show above. This will also help you to remove the hyperlink form the image that you have uploaded on your blog.

But I suggest you to follow the 1st method that will be easy for you, because you won't have to remove the hyperlink again and again. Any dought you can ask as we will try to help you out. Hope you have understood how we can disable the hyperlink that is automatically generated by default in blogger.

Wednesday, 20 April 2016

How to Change or Add New Favicon In Blogger

change the website icon or favicon in blogger

Favicon also know as website icon mostly of 16 X 16 Pixels in blogger you can change your website ion or favicon very easily. To remove the blogger default favicon , the big B icon to change that so that your website look like a professional one should add the custom favicon to their blog.

In Blogger BlogSpot you can upload your favicon or website icon up to 100 kb; you can upload the website icon in JPEG or PNG format. So make your favicon less then 100kb so that you can upload it and look like a professional blogger.

change the website icon or favicon in blogger

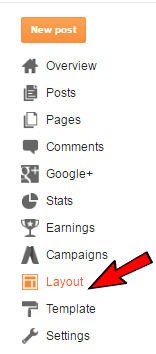
STEP - 1  Go to blogger > Blogger dashboard > layout

change the website icon or favicon in blogger

STEP - 2  In layout of your website you will see on the top most favicon > Edit

change the website icon or favicon in blogger

Note: If you don’t find favicon option or you want to add animated favicon to blogger you can follow from Step - 4

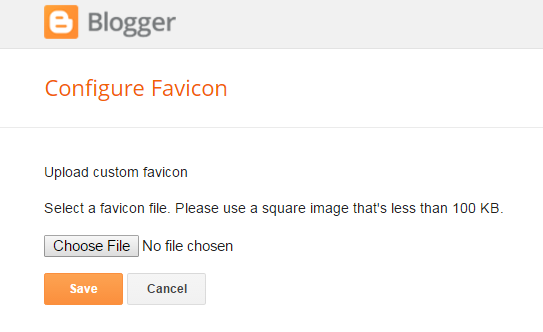
STEP - 3   Now you can chose you favicon and upload it, it should not be more than 100kb and save.

change the website icon or favicon in blogger

You are all done your favicon have been uploaded now you can enjoy with new professional website icon.
change the website icon or favicon in blogger

Note: If will take 24 hr or more to show the result on web server, but if then also Favicon is not been uploaded you have to repeat the same process again.

STEP - 4   For animated favicon to blogger Go to Blogger dashboard > template > Edit html

change the website icon or favicon in blogger

STEP - 5  Search for <b:skin>

change the website icon or favicon in blogger

STEP - 5  Now just above that past the bellow code.

<link href="add-your-favicon-url-here” rel="icon" type="image/gif"/>


Now replace add-your-favicon-url-here to your favicon link and save the template.
You are all done hope this works for you any doughy we will try to help you out, we think you have understood how we can add new favicon or website icon to blogger.

Tips to place the ads to increase the Google Adsense revenue

how to place the ads to increase the adsense revenue
Do you use Google Adsense on your blog & want to increase your revenue then these tips will help you to increase your revenue.

Size and location of Google Adsense play an important role to increase your Google Adsense revenue, in this post we will talk about this. The top Advertisement program for blogger is Google Adsense. The placement/ location of your Google ADS in your post is very important to increase your RPM.


You can defiantly maximize your earning by placing your ADS at right place, but be careful on placing your ads you should not force your viewers/ users to click on ads it is against the adsense policies and the publisher may not ask anyone to click their ads. Adsense code should not be placed in POP-UPS or Emails.

70% of blogger problem are that they are getting traffic to their website but their adsense revenue is not increased, having same problem? One of the region may be the placement or position of your Google ads, believe me placement of your ads will surely increase your revenue the font color, size of ADS, is your ads text and image ads this matter a lot, after reading this tips you will surely boost up your revenue.

Placing Google ADS Just Under Title Tags Or After Introduction.


Placing ads below title tags or below introduction will help your ads visible to users, most of to user do not like to scroll down to read your entire post so by placing your ads on top will increase the chance of click to your ads. Now a question raises what type and which size of ads should be placed on top, I recommend 3 types of ads.

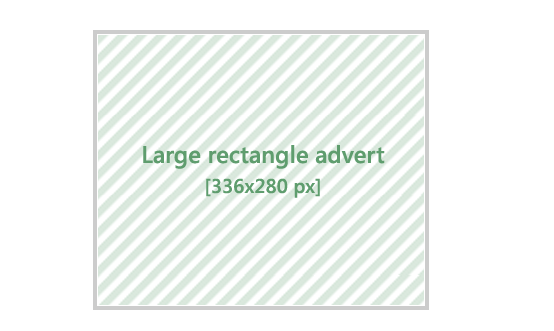
# 336 X 280 Pixels
how to place the ads to increase the adsense revenue

# 728 X 90 Pixels
how to place the ads to increase the adsense revenue

# Your post width X 280 pixels this is Custom Size ADS.
how to place the ads to increase the adsense revenue


Placing Google ADS Between The Content.


Placing the Ads between the content, the ads that should be placed between the posts are

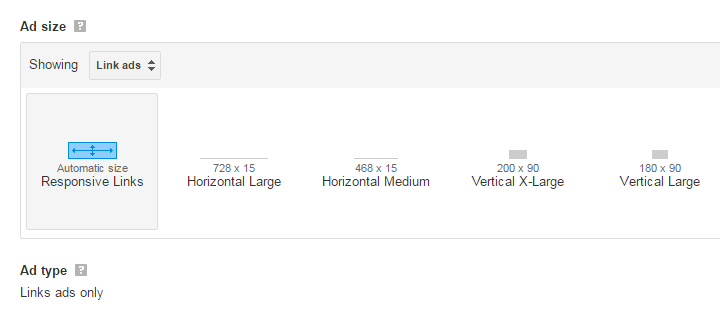
# Link Ads
how to place the ads to increase the adsense revenue
Link Ads are the Ads that are most powerful Ads, most of the blogger forget to apply on their blog so I suggest to apply it any were in your blog post and you can also apply it on your Navigation Bar to increase your Google Adsense revenue.

# Large Skyscraper ADS that is 300 X 600 pixels


Placing Google ADS At Bottom Of The Post.


Placing the ads at the bottom of your post will help you to increase your revenue. At bottom you can add Google ads because Google will show the relevant ads based on the keywords used on your post use the high CPC keyword will also help to boost your Adsense revenue. At bottom you can use any type of ads but it should be image and text Google ADS

NOTICE: Always add the ads font color similar to your text color. Example - If your text color is red on the post add the red font color on your Google ads. I mean to say that your ads should not look like ads.

Placing Google ADS Between Two Post.


Placing your Adsense ads between two posts will help also help you to increase your Adsense revenue. You can place this ads by going to Blogger Dashboard > Earning > Adsense , there are three option you can chose the beast option for your blog.

# Display ads below my posts and in the side bar
# Display ads below my posts only
#Display ads in the side bar only


Placing Google Custom Search Box.

You can place your Google custom search box on top inside the navigation bar, how to integrate Google search box in one of my blog post I have shared with you all with step-by-step you can see , integrate Google Adsense Custom Search in blogger blog.


Now, if you want to ask me any question on this or having any question about the placement of your ads and always select Text and image ads for your blog. Hope you all have understood how to place your Google ads on your blogger blog for higher revenue.

Don’t forget to share this post with others on Facebook and other social media.

Monday, 18 April 2016

How to add Read More button for homepage in Blogger


Read more button link or jump link or continue link in blogger post for homepage to display an automatic “read more” button that reduces the full article into 50-70 words and images that display on your home page. Read more links for home page will make your website/ blog load faster. And make your home page look neat and clean. The read more button that we are going to add today to your BlogSpot will be pure CSS code, later on you can change the Color, font size as per your requirement. Read more links give your viewers an idea that what is inside that blogger post a Post Summary type for your blogger post. So let see how we can do it. I have shared on one of my post How can we Create CSS BUTTONS in blogger you can take a look on that also.


LIVE DEMO

You can see the live demo to my own website homepage.

How To Add CSS Read More Button for Homepage In Blogger.


STEP - 1  GO to Blogger > Templates > Edit HTML

How to make read more button for blogger post on homepage

STEP - 2   Search For

]]></b:skin>


STEP - 3   Now add the below Code just above this ]]></b:skin>

.coderambo_read a:hover,{
background: #111;
border: 1px solid #111;
color: #fff;
}

.coderambo_read a {
background: #ca2129;
padding: 9px 25px;
color: #fff;
font-family: 'American Typewriter';
border-radius: 2px;
display: inline-block;
border: 1px solid #BE1212;
transition: all .3s ease-in-out;
font-size: 22px;
text-decoration: none;
margin-top: 12px;
}


STEP - 4  Search For

<data:post.body/>
NOTICE: You will see similar code two to three place but you have to be careful about the right code, don’t worry it is easy!

STEP - 5  Just below that you will see Read more >> or <a expr:href='data:post.url'>

<b:if cond='data:blog.pageType != &quot;static_page&quot;'>
<b:if cond='data:blog.pageType != &quot;item&quot;'>

<p><a expr:href='data:post.url'>Read More</a></p>

</b:if>
</b:if>

Or you May see this Code or similar code like this.

<b:if cond='data:blog.pageType != "item"'> 

<a expr:href='data:post.url'>
<div style="text-align: right;">< img src=http://xyz.com border="0"/></div></a> 

</b:if>
STEP - 6  In above code simply replace the highlighted code with this code.

<div class="coderambo_read">
<a expr:href='data:post.url'>Read More</a>
</div>

STEP - 7 Now Just Save Template.

How to make read more button for blogger post on homepage

Now you are all done !! hope this work for you, you can easily make changes the CSS colors, font style, font size and other CSS code as per your requirement. Hope you have understood how we can add Read More button for homepage in Blogger don’t feel shy to ask anything where ever you are facing problem ask on the comment section.

How to integrate Google Analytics to blogger blog

How to integrate Google Analytics to blogger blog

Having a blog you should have GOOGLE ANALYTICS a product of Google that is free for every blogger and website owner and it is recommended to every blogger. It gives all the details about where your traffic coming from. The cool part of Google Analytics is it gives REAL TIME Overview, Location, and the Traffic Source, Audience from which Contrary your traffic coming form, and the bounce rate of your blog or website. I personally am using Google Analytics and it is great.

Today in this post I will show step-by-step how we can integrate Google Analytics to blogger so that you can track your organic traffic and the growth of your blog. Since Blogger is a Google product it has easy setup for Google Analytics in blogger.

How To Embed New Website To Google Analytics


STEP - 1  Go to Google type Google Analytics and Login through your Gmail.

How to integrate Google Analytics to blogger blog

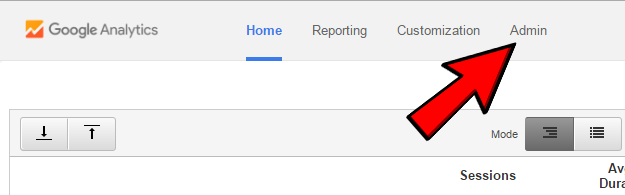
STEP - 2   On the top right you will find ADMIN Click on that.

How to integrate Google Analytics to blogger blog

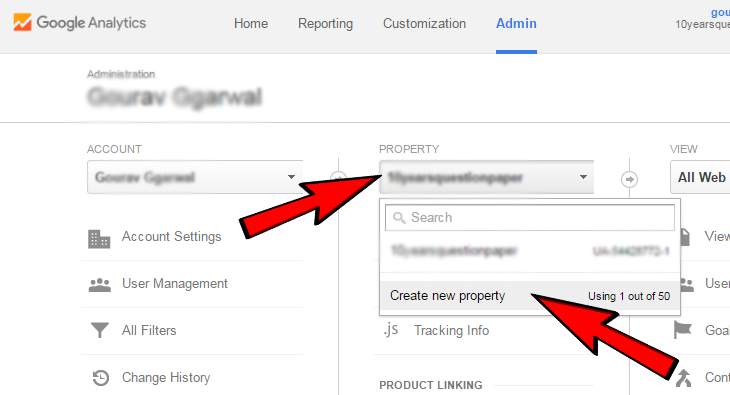
STEP - 3  Then you will find three section Account, PROPERTY and view. Click on Property then on CREATE NEW PROPERTY .

How to integrate Google Analytics to blogger blog

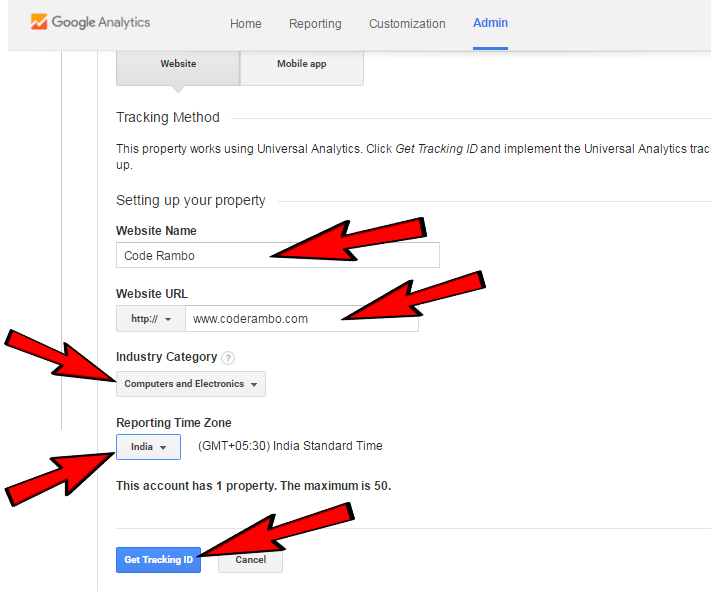
STEP - 4  Now this is the important step under the section on WEBSITE Fill the form, on WEBSITE NAME write your website name, WEBSITE URL write only www.yourdomain.com , chose your INDUSTRY CATEGORY , then select your REPORTING TIME ZONE I am form India I select India standard time, Now Click to GET TRACKING ID .

How to integrate Google Analytics to blogger blog

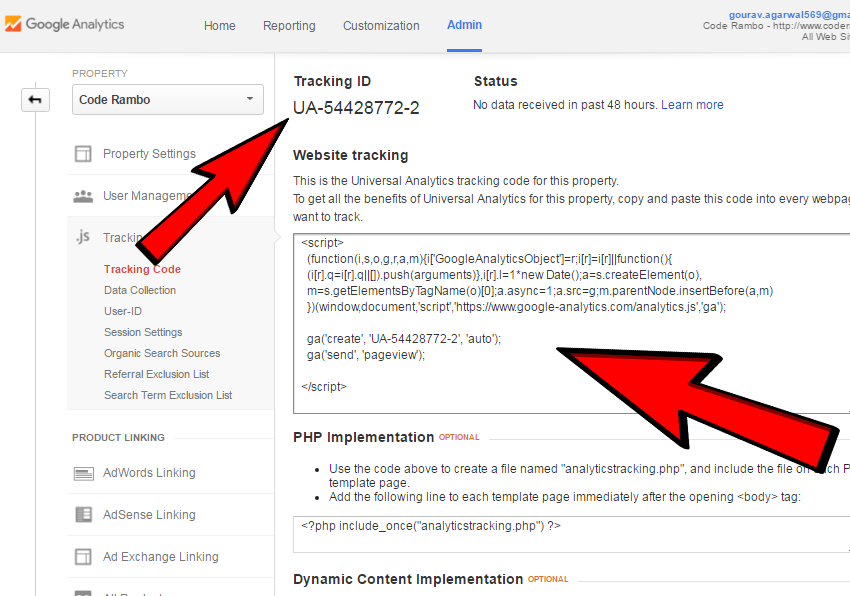
STEP - 5  Now you have to do two thing you will see I have marked 1st java script and second thing is your TRACKING ID .

How to integrate Google Analytics to blogger blog

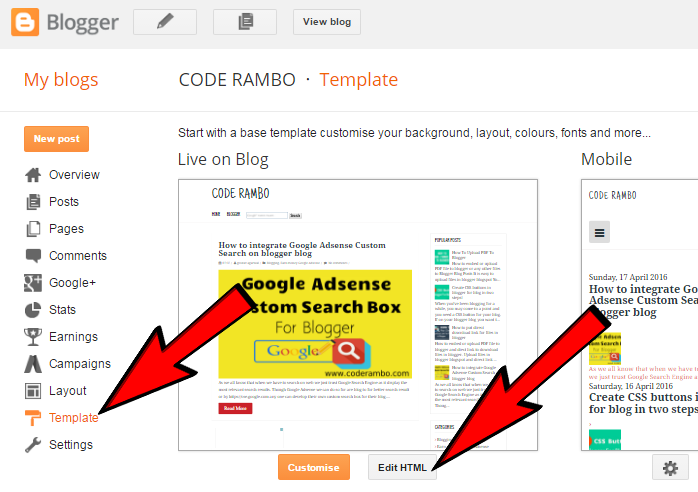
STEP - 6  Now go to your blogger and right side you will see TEMPLATE > then Click to EDIT HTML .

How to integrate Google Analytics to blogger blog

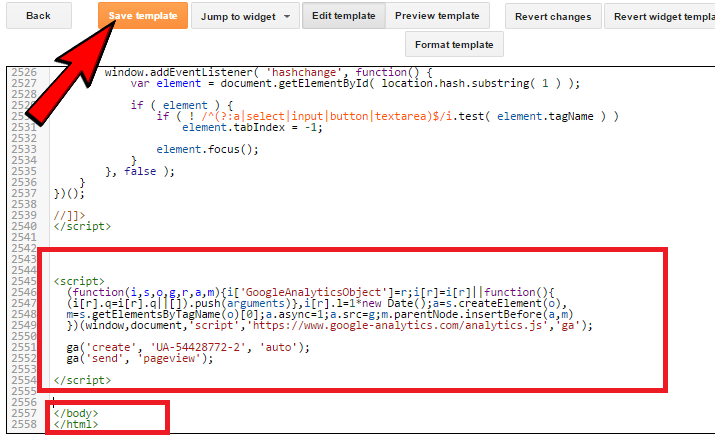
STEP - 7  Search </body> Just above that past the java script that I have marked on screenshot on the step -5 and then click Save Template .

How to integrate Google Analytics to blogger blog

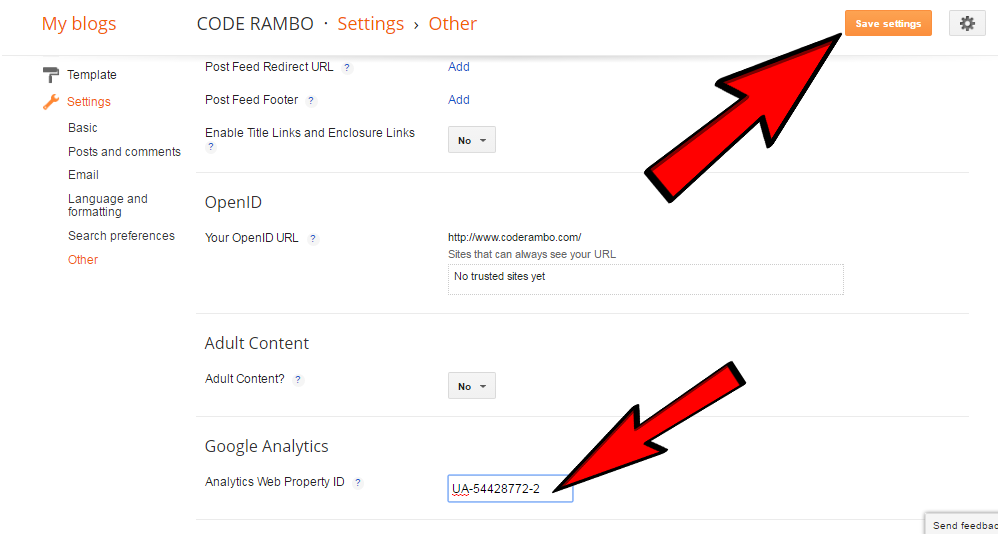
STEP - 8  On the left side of your blogger dashboard there will be SETTINGS , under settings there will be option OTHER

How to integrate Google Analytics to blogger blog

STEP - 9  Scroll down you will see GOOGLE ANALYTICS . Under Analytics Web Property ID past the Tracking ID that I have marked on the Step 5 and Save Settings .

How to integrate Google Analytics to blogger blog

Once you have done all the steps your Google Analytics will activate and you will receive all your data from 48 hours. Now you are all done :) hope you all have understand how to integrate Google Analytics to blogger blog. if you are using google analytics on your blog share your reviews on the comment section.

Sunday, 17 April 2016

How to integrate Google Adsense Custom Search on blogger blog

How to integrate  google Adsense Custom Search on blogger blog

As we all know that when we have to search on web we just trust Google Search Engine as it display the most relevant search results. Though Google Adsense we can do so for are blog to for better search result or by https://cse.google.com any one can develop their own custom search box for their blog. One of the good things about this Google Custom Search Box is that the readers can find their search within your blogger blog.
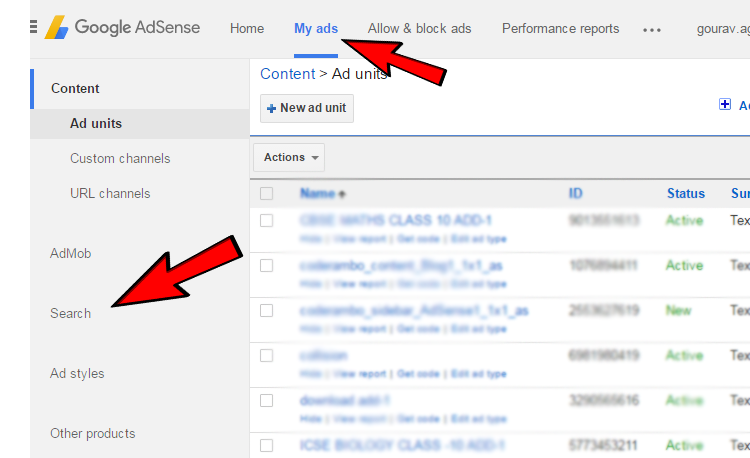

You can earn handsome amount of money with Google Adsense for Search. It is easy to integrate Google Adsense custom search box that can increase your blog revenue and will surely increase your Revenue per 1000 impressions (RMP).

In this tutorial, I will be creating and installing Google search box to boot up your search result for your blogger blog and that will increase your revenue, your RMP and it will also help to lower down the bounce rate of your blog.

STEP - 1   Open your Adsense account, click to MY ADS . On left side you will find Search , click on that.

open google Adsense account and find Search

STEP - 2   See on the top there will be NEW CUSTOM SEARCH ENGINE Click that.

open google Adsense account and find Search


STEP - 3   Fill your site name in the place of NAME . Now in the what to search Select ONLY SITES I SELECT and write the complete URL including HTTP:// of your sites you want to search or in which you are integrating on your blog/site.

open google Adsense account and find Search

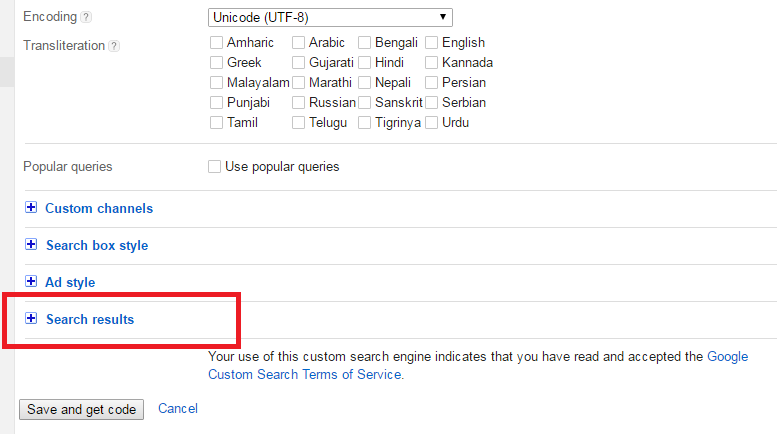
STEP - 4   scroll down there will be SEARCH RESULTS click on that.

open google Adsense account and find Search

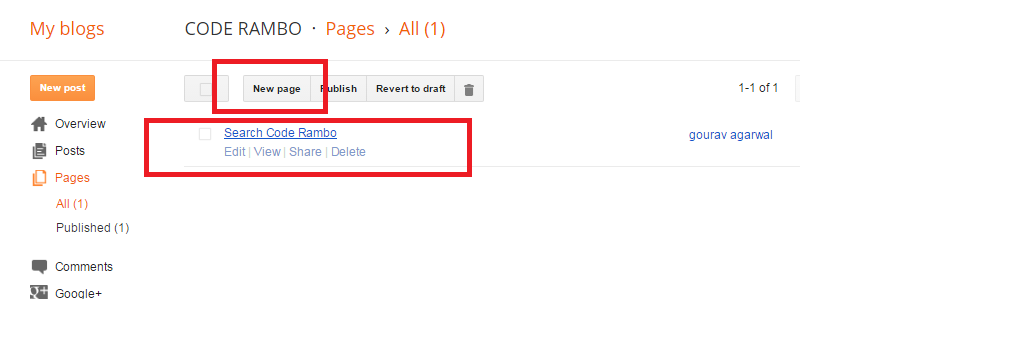
STEP - 5   Before you do anything on that go back to BLOGGER and create a NEW PAGE . And name it SEARCH your blog name.

open google Adsense account and find Search

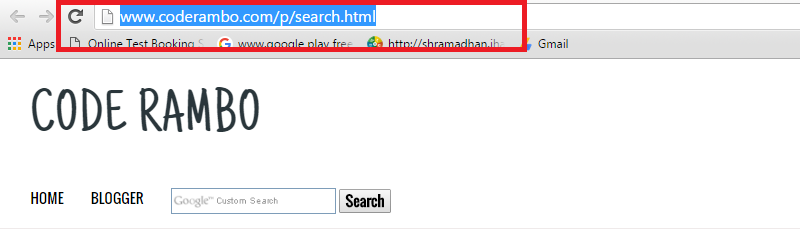
STEP - 6   Now copy the URLs of that page you have created on the STEP 5.

open google Adsense account and find Search

STEP - 7   Now go back to GOOGLE ADSENSE on DISPLAY RESULTS . Select ON MY WEBSITE USING IFARME then enter your URL and then Click on SAVE AND GET THE CODE.

open google Adsense account and find Search

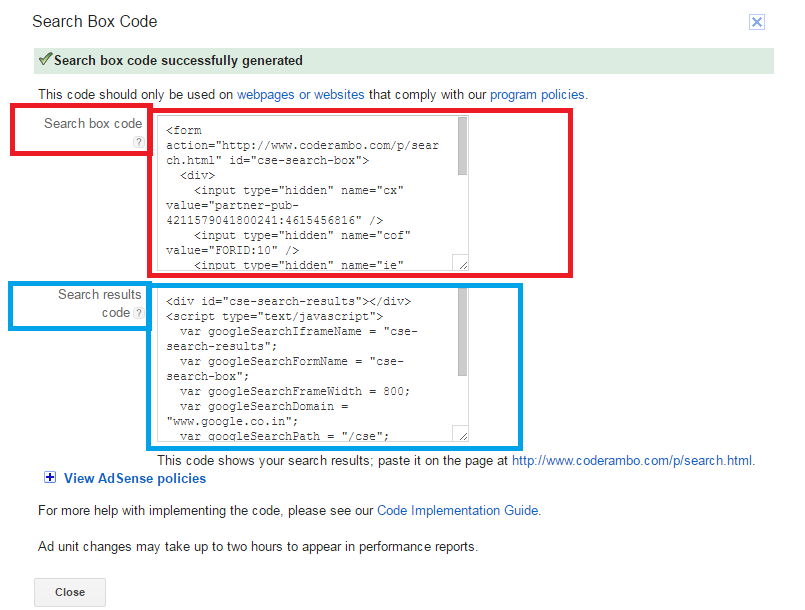
STEP - 8   After saving it . You will get two codes. The 1st code is for displaying the Google Custom Search Box, and the 2nd code is to be added in the page the we have created on SETP-5 and the result will show on that page.

open google Adsense account and find Search

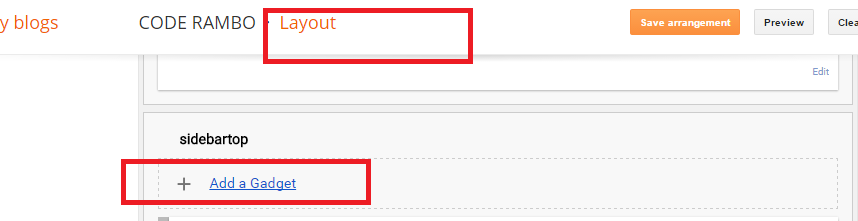
STEP - 9   Now go to LAYOUT then ADD A GADGET .

open google Adsense account and find Search

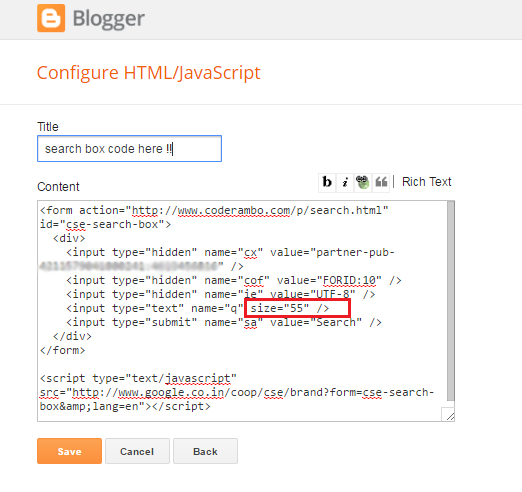
STEP - 10  Now copy the code that I have marked it with RED on the screenshot. The search box code and past it and SAVE.

open google Adsense account and find Search

NOTICE : YOU can change the size.that i marked it on the above screenshot.

STEP - 11 Open the page that you have created and past the second code that I marked with BLUE on the STEP -8 / The SEARCH RESULTS CODE and save it.

open google Adsense account and find Search

Hey well! You are done, now you can start earning form Google search box. let us know if you are facing any problem or you are using Adsense for search and you have started earning form it. Hope you all have understand how we can integrate Google Adsense Custom Search on blogger blog.

Saturday, 16 April 2016

Create CSS buttons in blogger for blog in two steps!

how to make CSS button in blogger When you’ve been blogging for a while, you may come to a point and you need a CSS button for your blog. If on your blogger blog you want to display colorful and cool buttons with links you can put the CSS codes to your blog. It is simple to do just you can copy the code that past is to your blog post or any where you want to put the CSS code. In two steps you can do that. This is the CSS button with mouse hover effect that means when someone come to click the CSS button the color changes text color change it look great on the blogger BlogSpot.

LIVE DEMO !!

Read More


STEP - 1   GO to BLOGGER > TEMPLATE > EDIT HTML then find  </b:skin>

How to make CSS button in blogger for blogger blogspot blog


STEP - 2   Now copy the code and past just above the  </b:skin>

.button.button-border:hover {
background-color:#444;
color: #FFF;
border-color: transparent !important;
text-shadow: 1px 1px 1px rgba(0,0,0,0.2);
}
.button.button-border.button-small {
line-height: 30px;
}
body:not(.device-touch) .button {
transition: all .2s ease-in-out;
}
.button.button-small {
padding: 8px 18px;
font-size: 22px;
height: 32px;
font-family: Oswald, sans-serif;
text-decoration: none;
margin-bottom:5px;
float:right;
}
.button.button-border {
border: 2px solid #444;
background-color: transparent;
color: #333;
text-shadow: none;
}
.button {
display: inline-block;
position: relative;
cursor: pointer;
outline: none;
white-space: nowrap;
margin: 5px;
}
.button.button-rounded {
border-radius: 3px;
}
After you past it to Blogger TEMPLATE SAVE it. If You want to change the color of :hover you can change it by change the code of color marked in red.
STEP - 2  copy the code given bellow and pate it where ever you want to show the CSS Button in your blog.

 <p><a class="button button-small button-border button-rounded" href="#">Read More</a></p>


Now you are all done hope this work in your blog. This is the cool CSS button for your blog.

Friday, 15 April 2016

How to put direct download link for files in blogger

how to upload pdf to blogger and have direct link in blogger

How to embed or upload PDF file to blogger and diect link to download files in blogger.

Upload files in blogger blogspot and direct link it with google drive and that will help you to direct download the file.

Hi in this post I will help you to upload you’re PDF, DOC and other file to you is blog and gives you the code that will directly download the files in your blog. One's you have uploaded files to your Google Drive you can link your file to download. In the previous post I have shared with you all How to upload file to blogger blogspot. You should see this fist and then follow the steps that I will show you.


Google Drive allows you to do this. Just you have to be careful with the codes or you will not get the result. In few simple steps you can directly link your files to your BlogSpot.

https://docs.google.com/uc?export=download&id=0B7wgH7yuc6glalJGcFFwallVWVE

NOW this is the code that GOOGLE DRIVES allow as to directly link to download files that have been unloaded to Google drive. Here you can see that link you can find that some code is there in red. I will tell you what is that in few steps to embed your files.

STEP - 1  Open your file in Google Drive that you have uploaded. Here I have PDF file.

How to put direct download link for files in blogger

STEP - 2  Click the option that i have marked it with Red.

How to put direct download link for files in blogger

STEP - 3  After you clicked that new windows will open , see the link and only COPY that much that I have marked it with red in the screenshot.

How to put direct download link for files in blogger

STEP - 4   NOW there will be the use of that link. That I have given before. In the place of red code you will past the code that you have copied from the GOOGLE DRIVE and link to your blogger post.

How to put direct download link for files in blogger

NOW you are all done. Just past the link you what your user or views of your website or blog to download the files. Hope you all have understood how to put direct download link for files in blogger.